Account Management
SFTP User Sync
SFTP User Sync connects your HR system or identity provider directly to Prodigy. Your HR system exports a CSV roster to a secure FTP endpoint on a schedule you control, and Prodigy takes it from there: new employees get accounts, existing records are updated, and terminated employees are deactivated, all without anyone touching the bulk uploader.
If your organization hires and offboards people regularly, this removes the manual roster maintenance entirely. Most HR platforms (UKG Pro, Workday, ADP, and similar) support scheduled SFTP file delivery out of the box.
Activation required
SFTP User Sync is available on request. The FTP User Sync page is visible to every organization admin under Settings → Integrations, but before you can complete setup your organization needs the feature activated. Contact your Prodigy representative or support@prodigyems.com to turn it on.
How it works
- Your HR system uploads a CSV file to Prodigy's secure FTP server over SFTP.
- Prodigy automatically detects and processes new files, checking every 5 minutes.
- Each row is matched to a user: new users are created, existing users are updated, and users marked
terminatedare deactivated. - The results of every sync are logged in a full sync history, and email alerts keep you informed of failures or items that need attention.
Before you start
You'll need:
- A Prodigy organization admin account, with SFTP User Sync activated for your organization
- An HR system (or any process) that can export a CSV and deliver it over SFTP on a schedule
- An SSH key pair for authentication. Your HR system or SFTP client generates this; you'll paste the public key into Prodigy during setup. Both
ssh-rsaandssh-ed25519keys are supported, and no passwords are involved.
Check your Prodigy role first
Organization admin is a specific role in Prodigy, not a general description of seniority. The next role down, Training Officer, can do most day-to-day administration but cannot complete this setup.
How to check: look for Settings in the menu of your organization account. If it isn't there, you don't have the organization admin role.
How to get it: ask an existing organization admin at your organization to grant you the role. Every organization starts with one during onboarding. If you can't identify or reach yours, email support@prodigyems.com for help. A Training Officer can't grant this role, not even to themselves.
It's worth confirming before you begin. Setup runs several steps, and the permission is only checked when you save at the end.
Step 1: Run the setup wizard
In your organization account, go to Settings → Integrations → FTP User Sync and the setup wizard opens.
Connection details
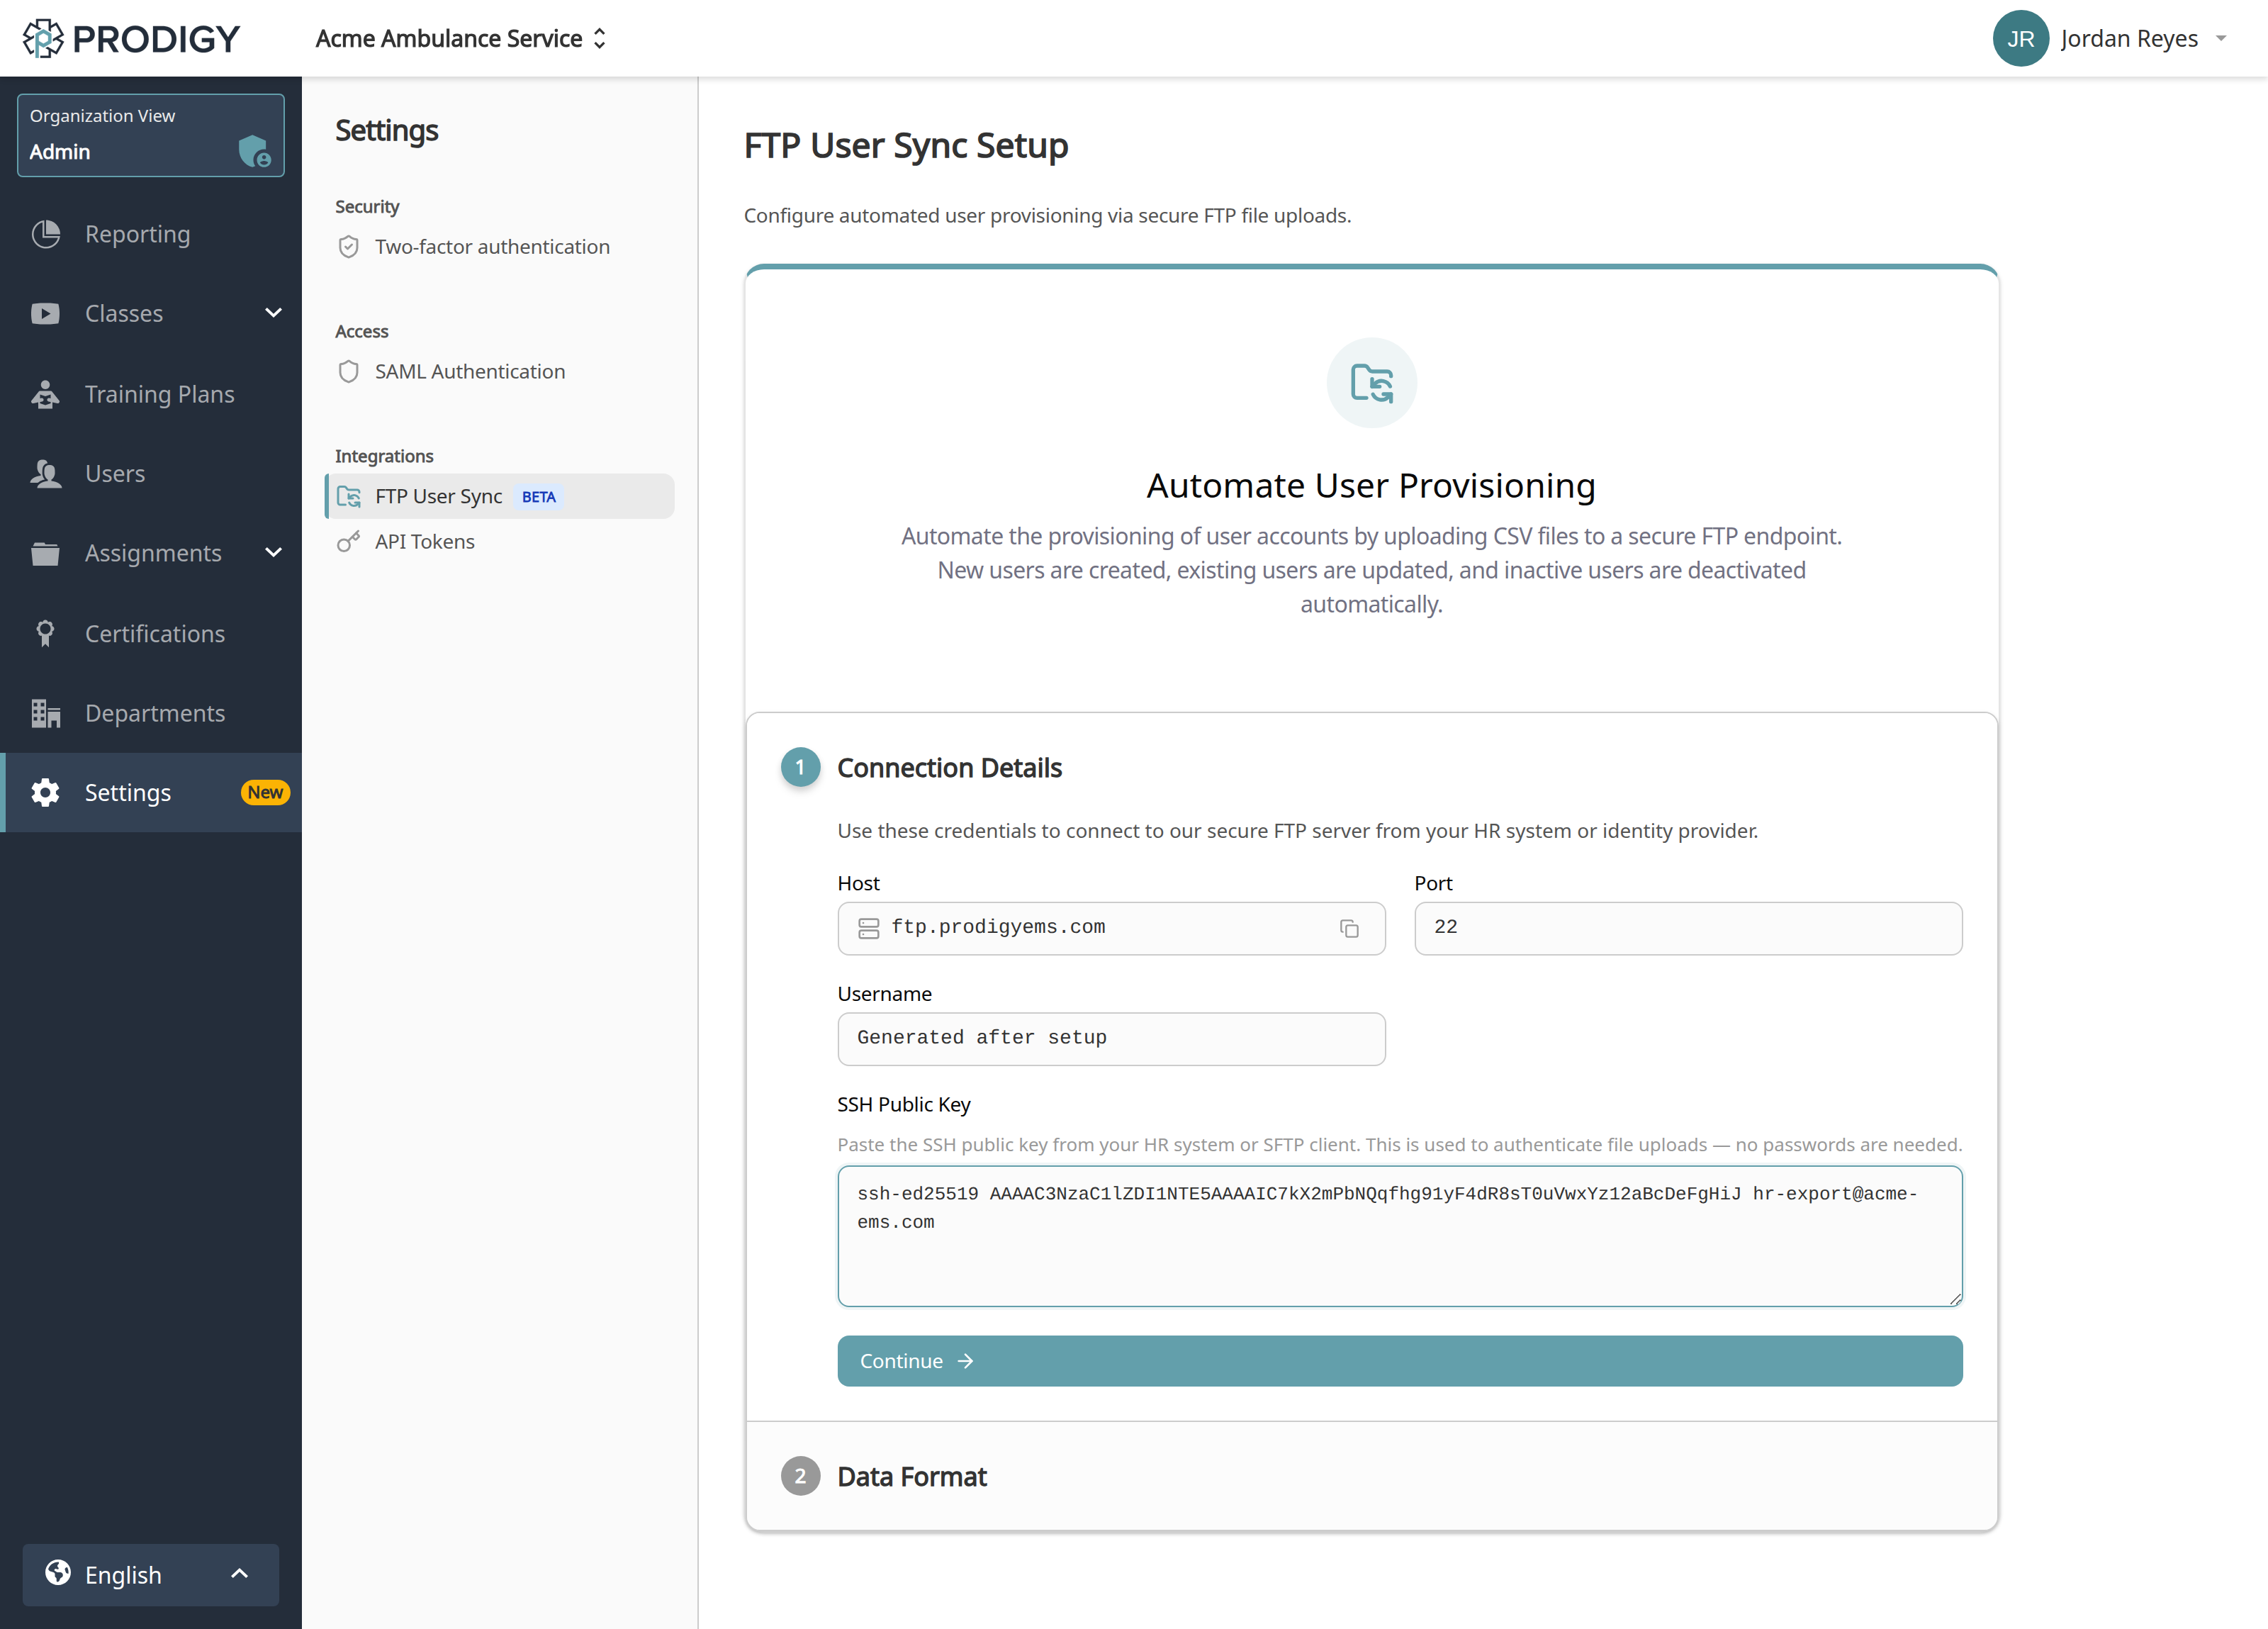
The first step shows the connection details your HR system will use:
| Setting | Value |
|---|---|
| Host | ftp.prodigyems.com |
| Port | 22 |
| Username | Generated when you complete setup |
| Authentication | SSH public key |
Paste the SSH public key from your HR system or SFTP client into the key field. This key is how file uploads are authenticated, so there's no password to store or rotate. If you ever need to change it, the Update SSH Key action on the dashboard reruns this step.
For your IT team's security review: each organization gets its own SFTP login, and that login is scoped to your organization's own folder on the server. It can't see or touch any other customer's files.
Data format
The second step summarizes the CSV format (covered in detail below) and lets you Download Sample CSV to hand your HR team a template. You can also download the sample CSV template directly, no sign-in needed.
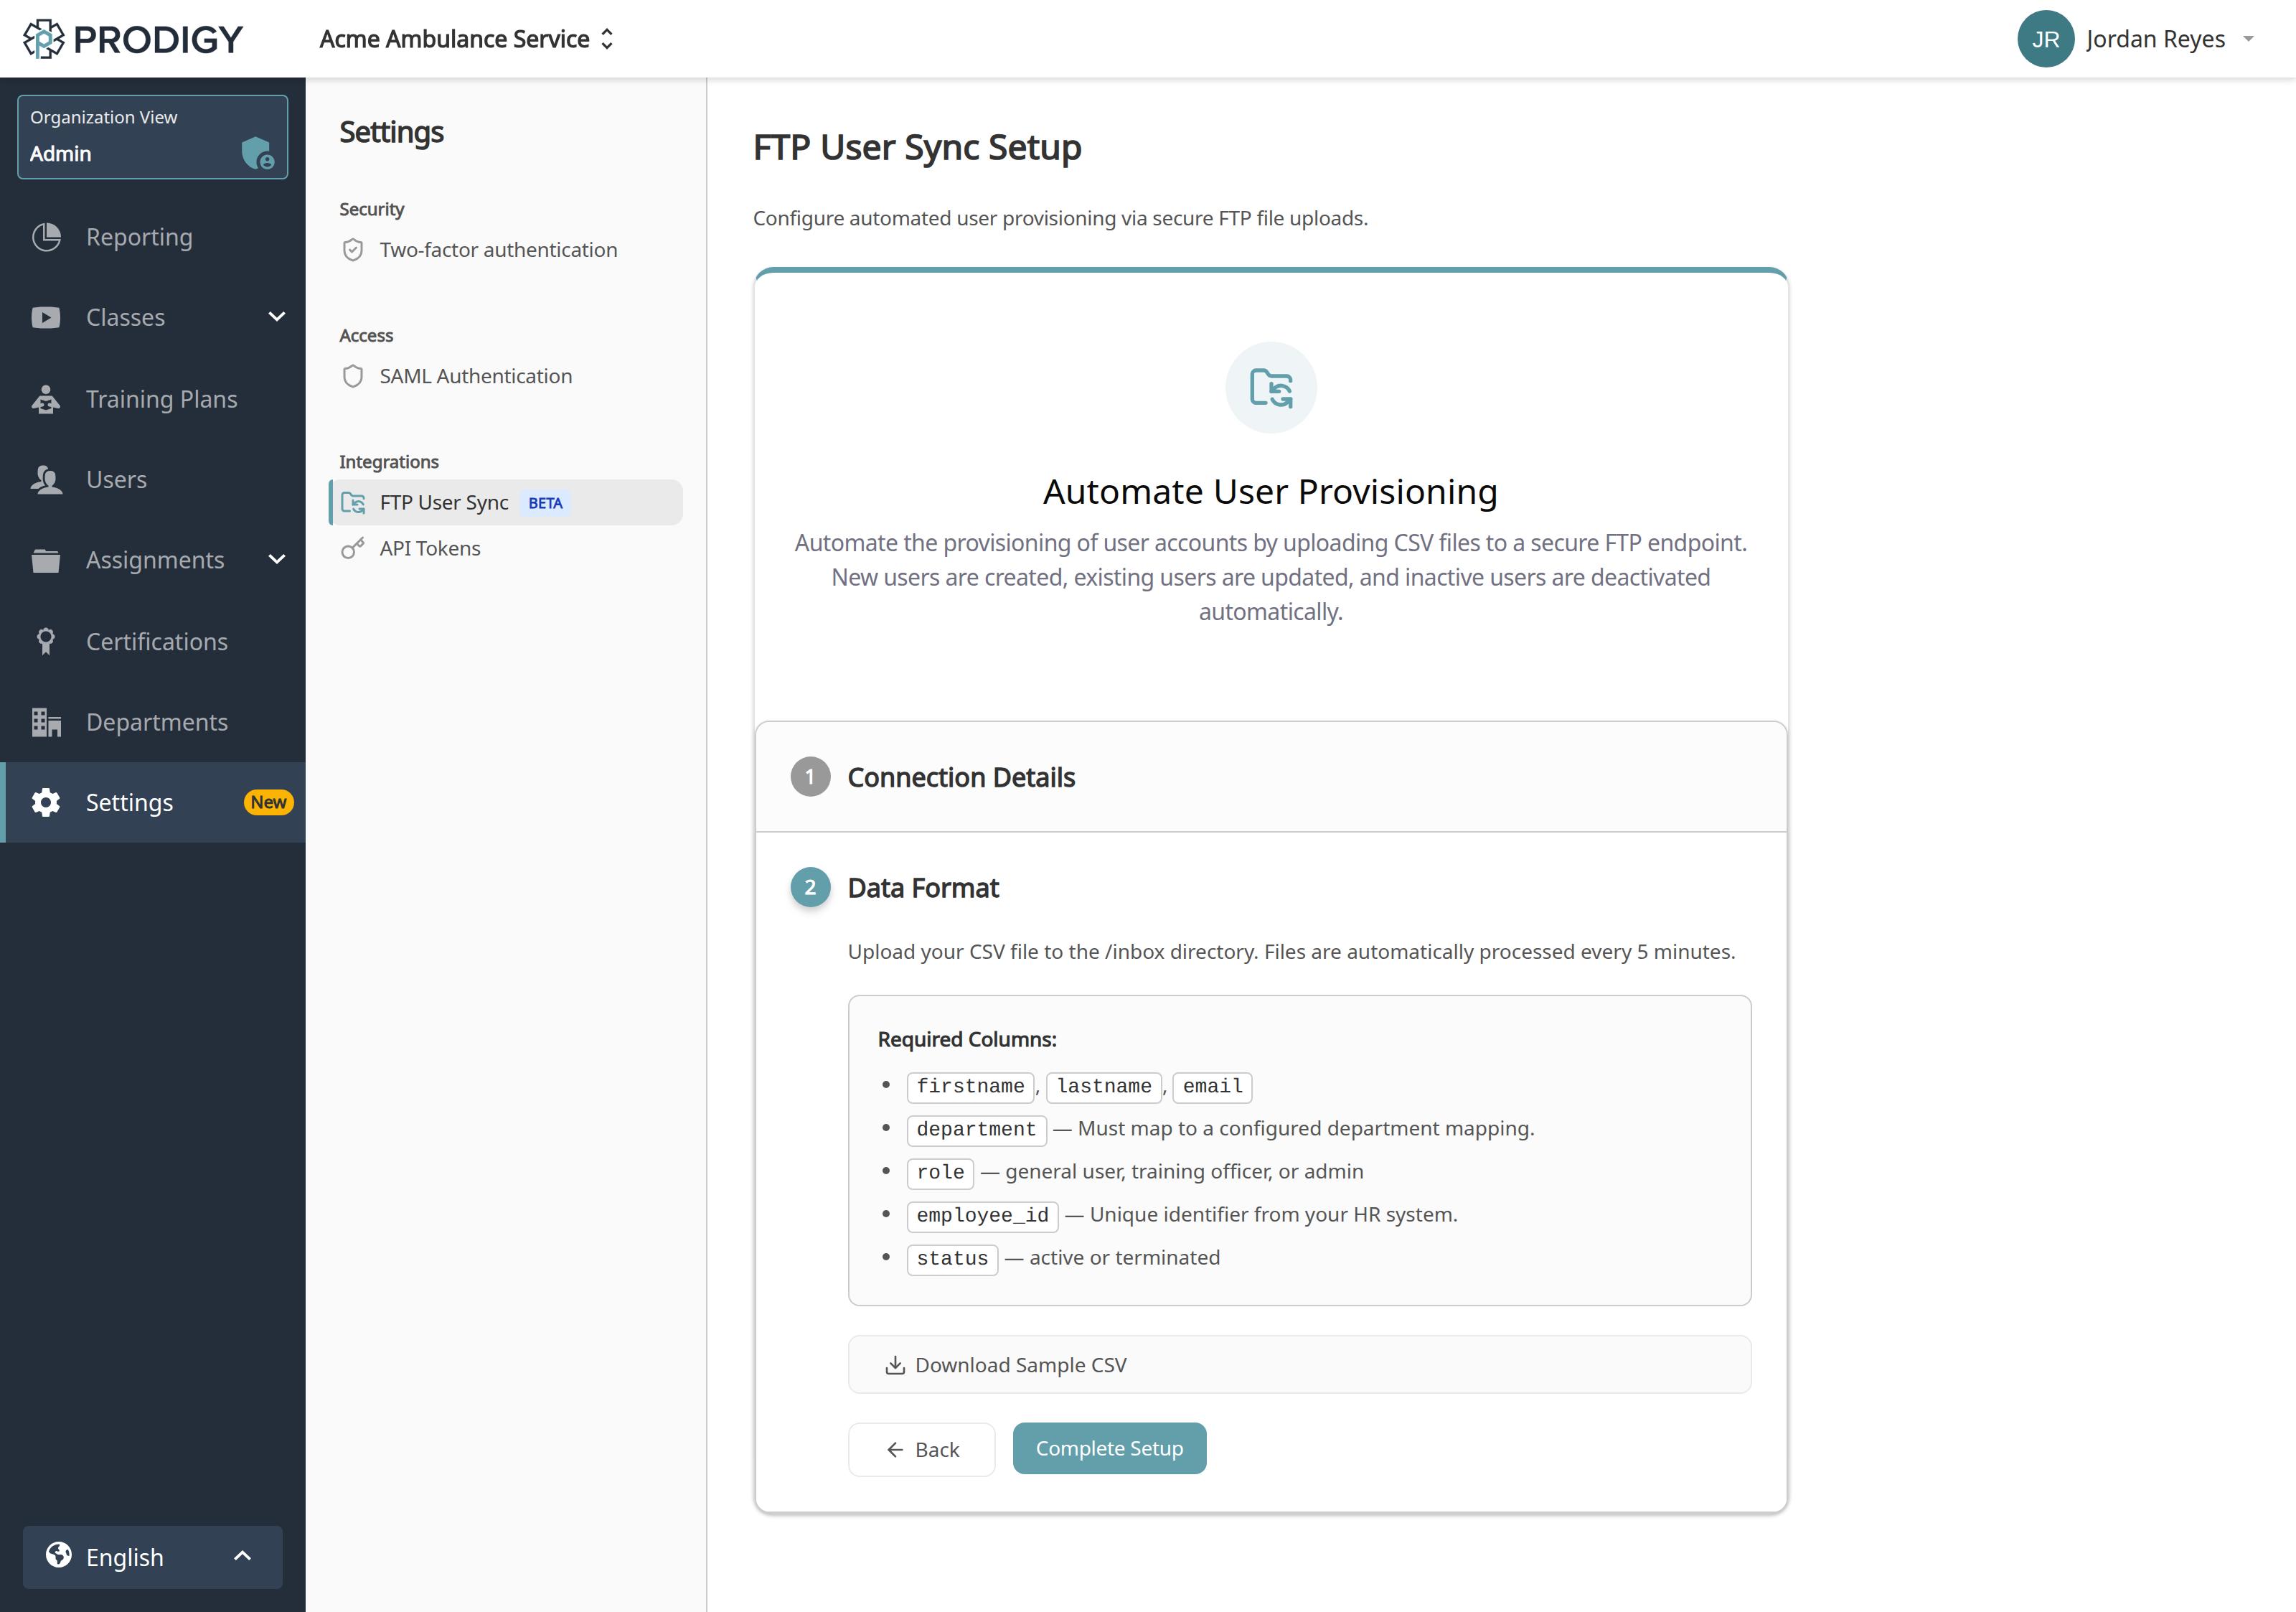
Click Complete Setup. Prodigy provisions your dedicated SFTP account and generates your username. If provisioning shows as Pending or Failed on the dashboard afterward, use Retry Provisioning; if it stays failed, contact support.
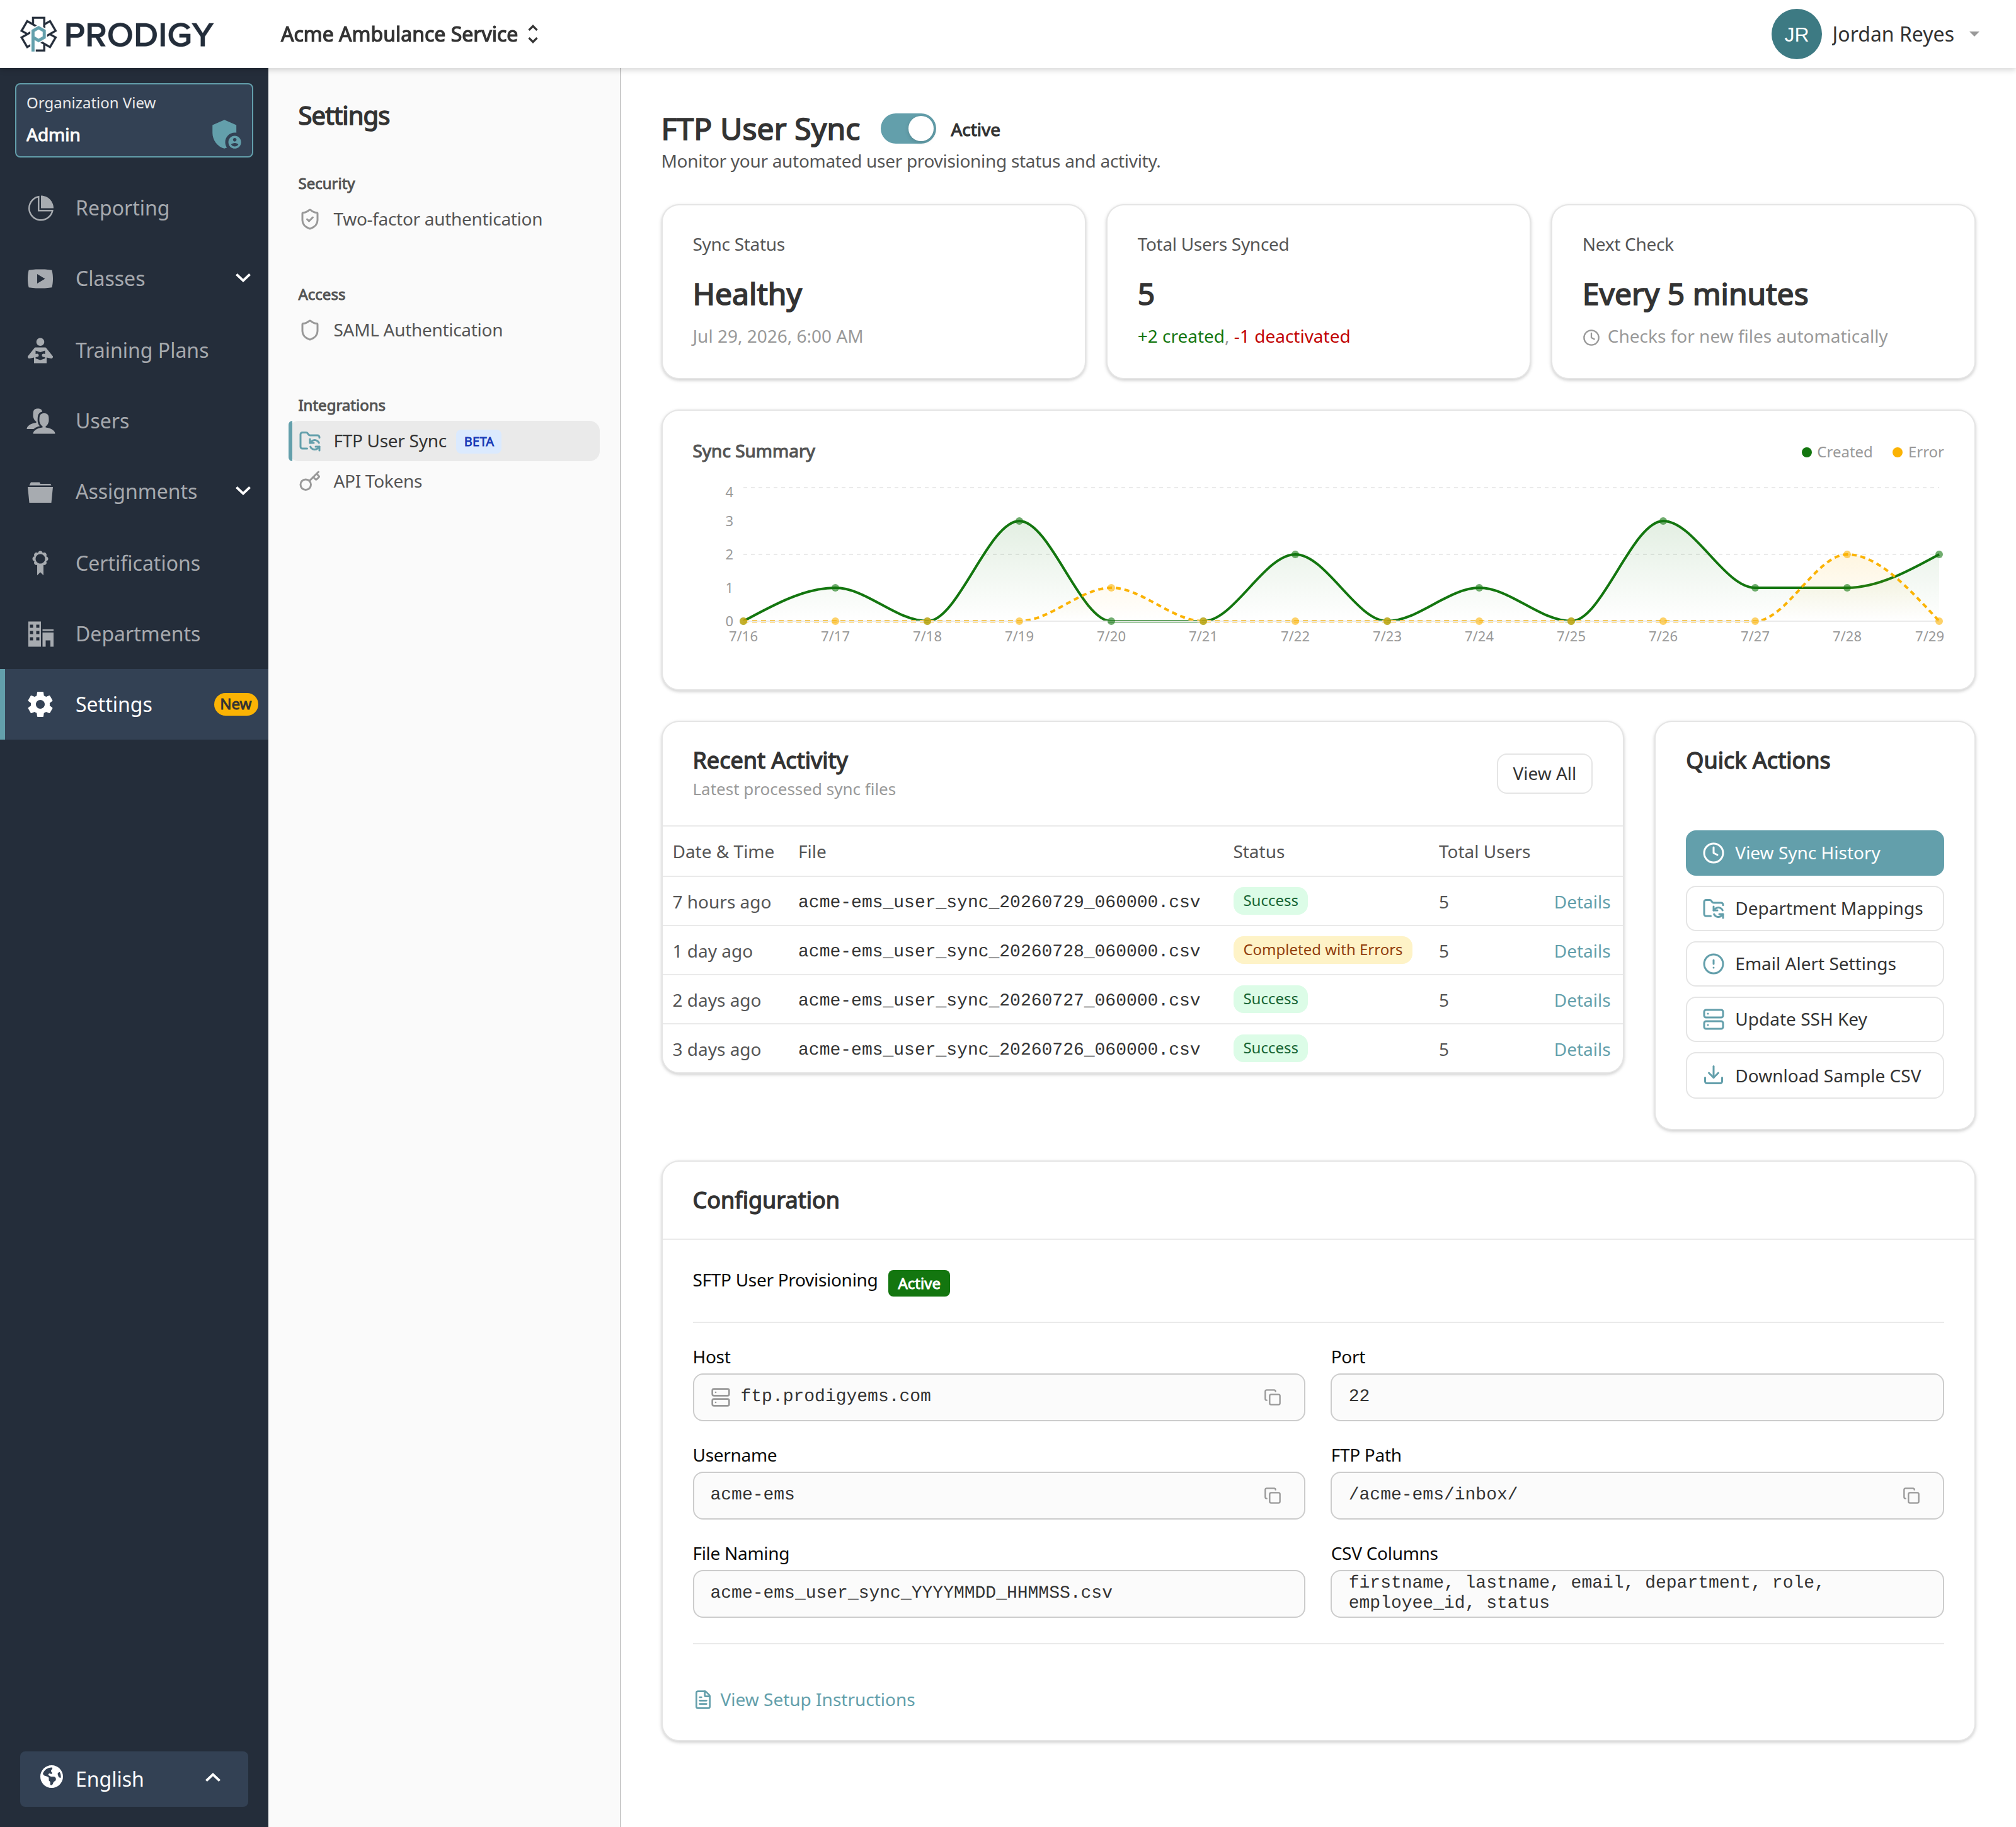
After setup, the Configuration card on the dashboard shows your full connection details, including the generated username, the upload path, and the file naming convention. Each value has a copy button so you can paste them straight into your HR system's file-delivery configuration.
Step 2: Set up department mappings
Department mappings link the department codes in your HR system's CSV to real departments in Prodigy. When a row is synced, its department value is looked up in your mappings to decide which Prodigy department the user belongs to.
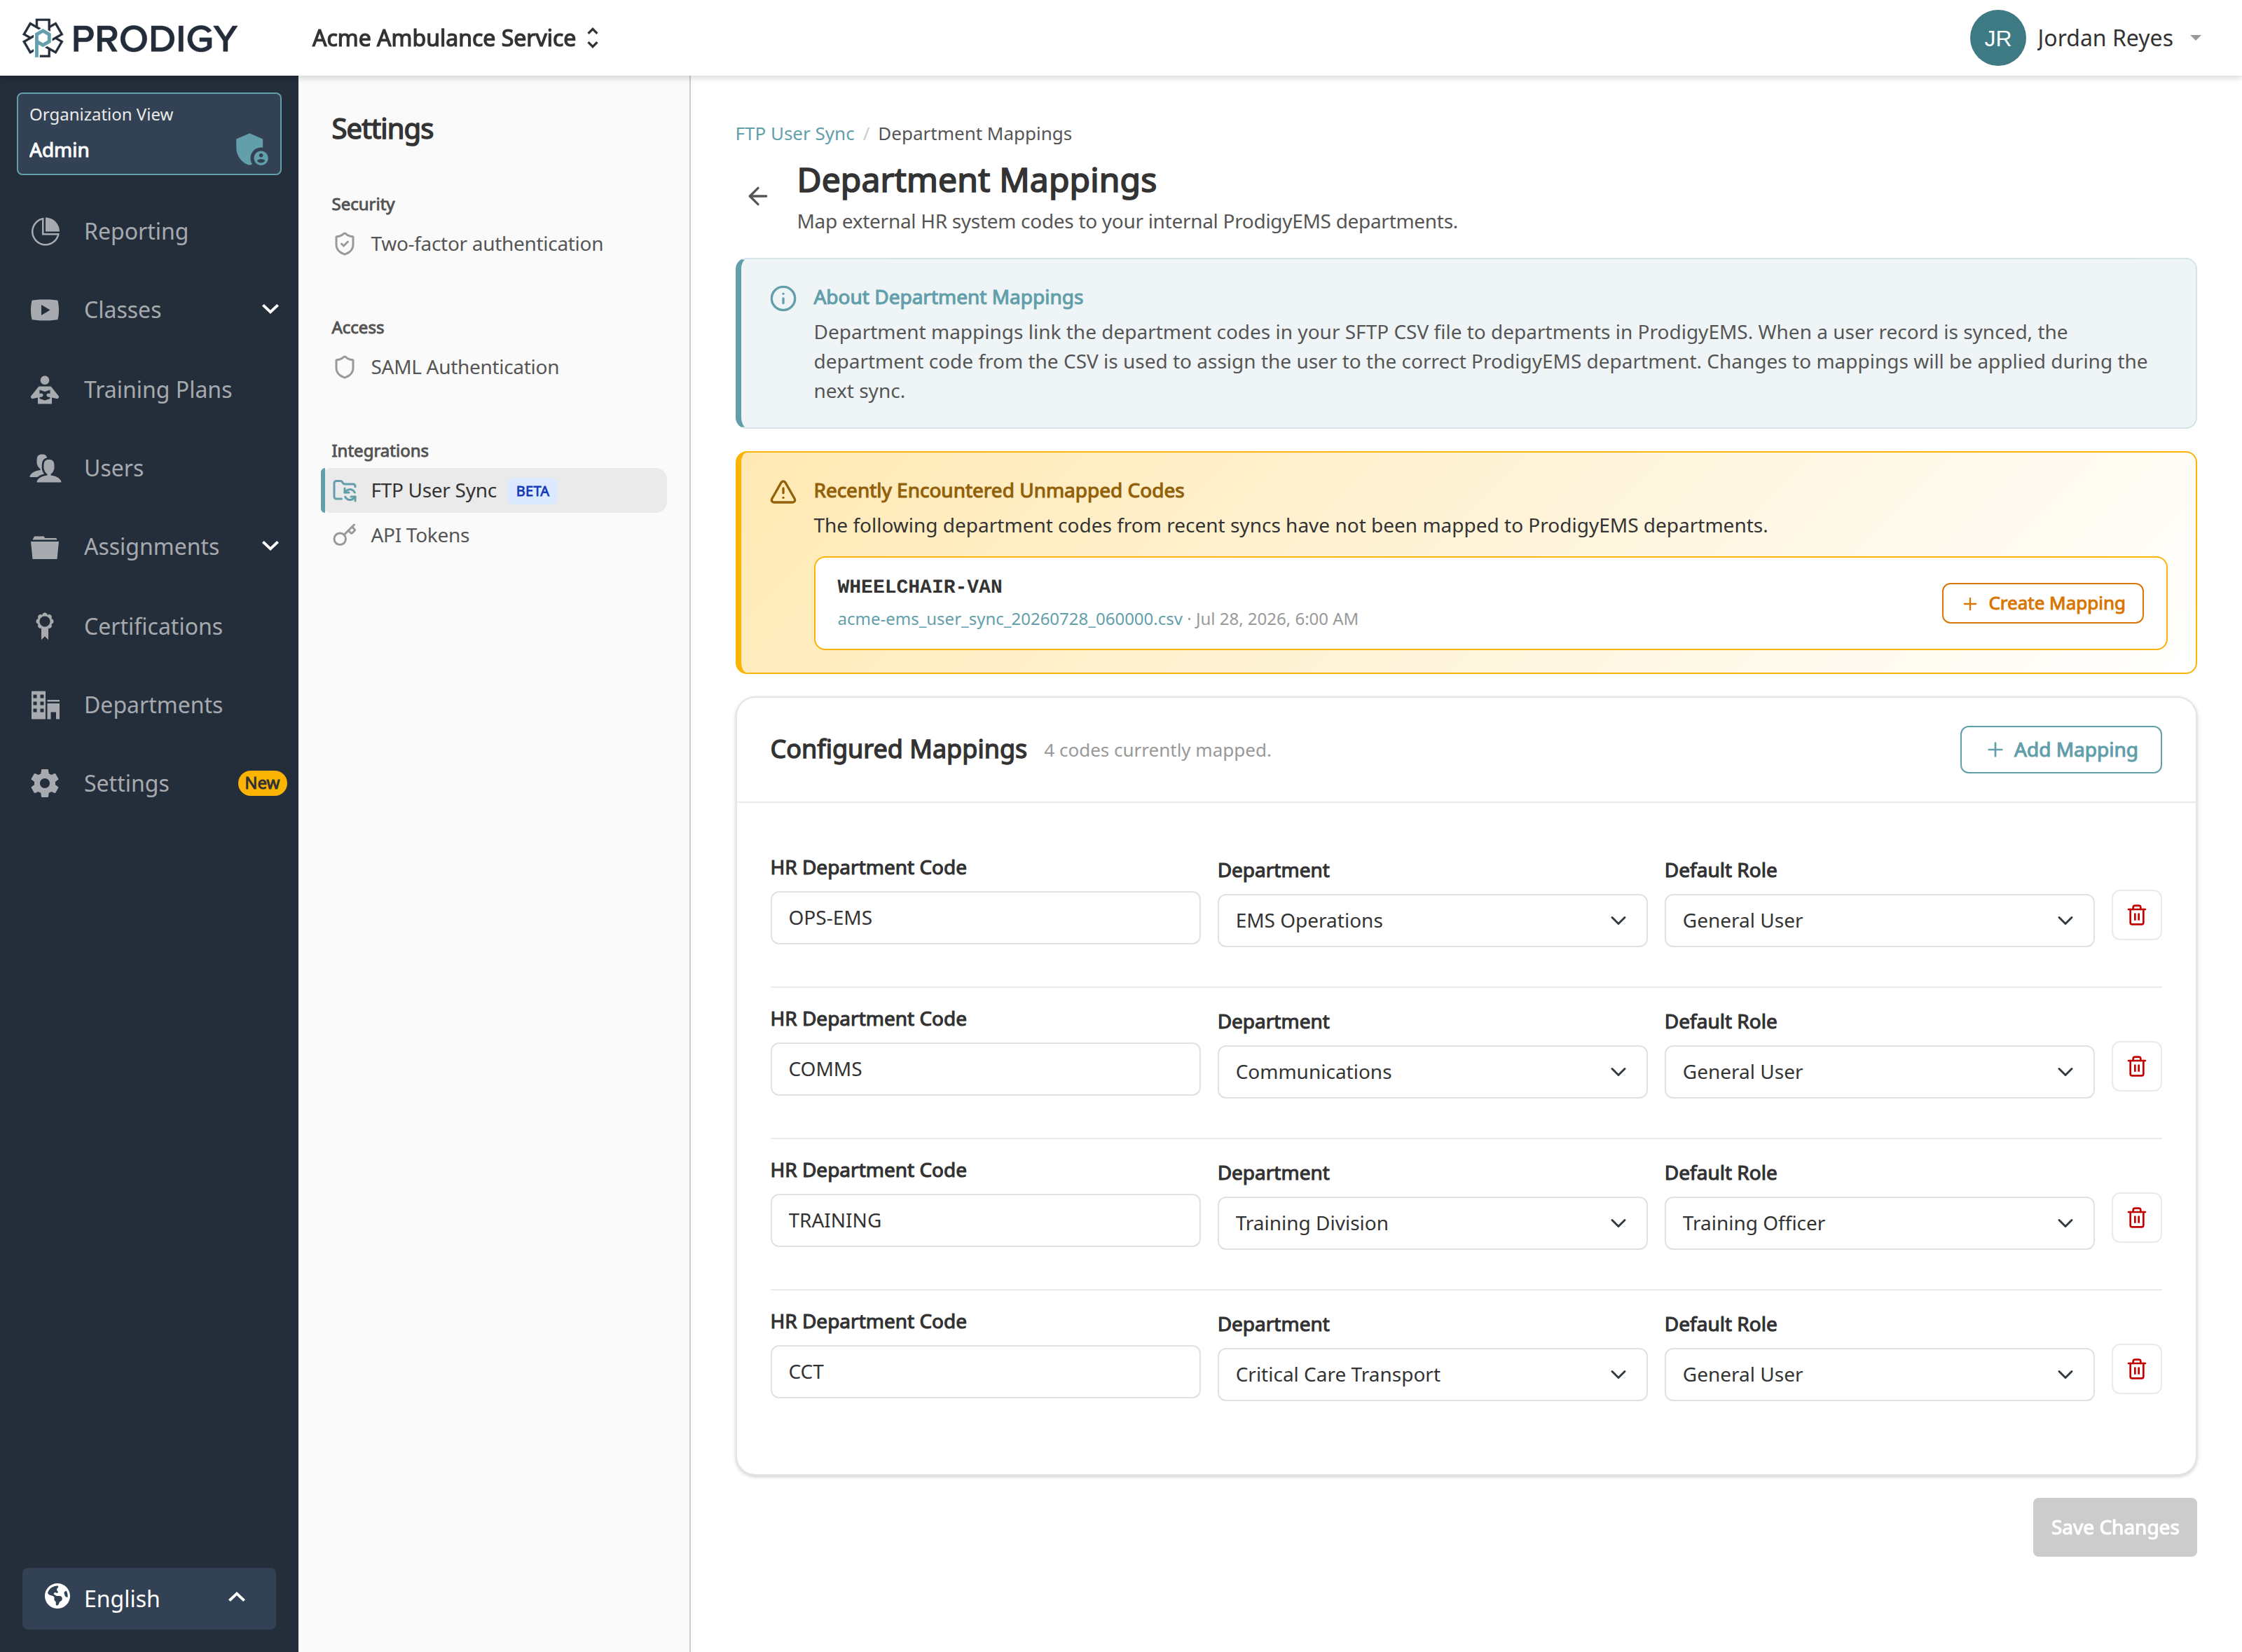
From the dashboard, open Department Mappings and click Add Mapping for each department code your HR export uses:
- HR Department Code: the exact code your CSV will contain (for example
DEPT-001). Each code must be unique. - Department: the Prodigy department it maps to.
- Default Role: the role assigned to users synced through this mapping when their CSV row doesn't specify one.
Rows with a department code that has no mapping are rejected with an Unmapped department code error, so it's worth setting up all your mappings before the first file arrives. If a sync does encounter unmapped codes, they're listed on the Department Mappings page so you can add them with one click, and you can opt into an email alert for them too. Mapping changes take effect on the next sync.
Step 3: Configure email alerts
Open Email Alert Settings from the dashboard to choose who hears about sync activity and when. Alerts go to the recipient email address you set here.
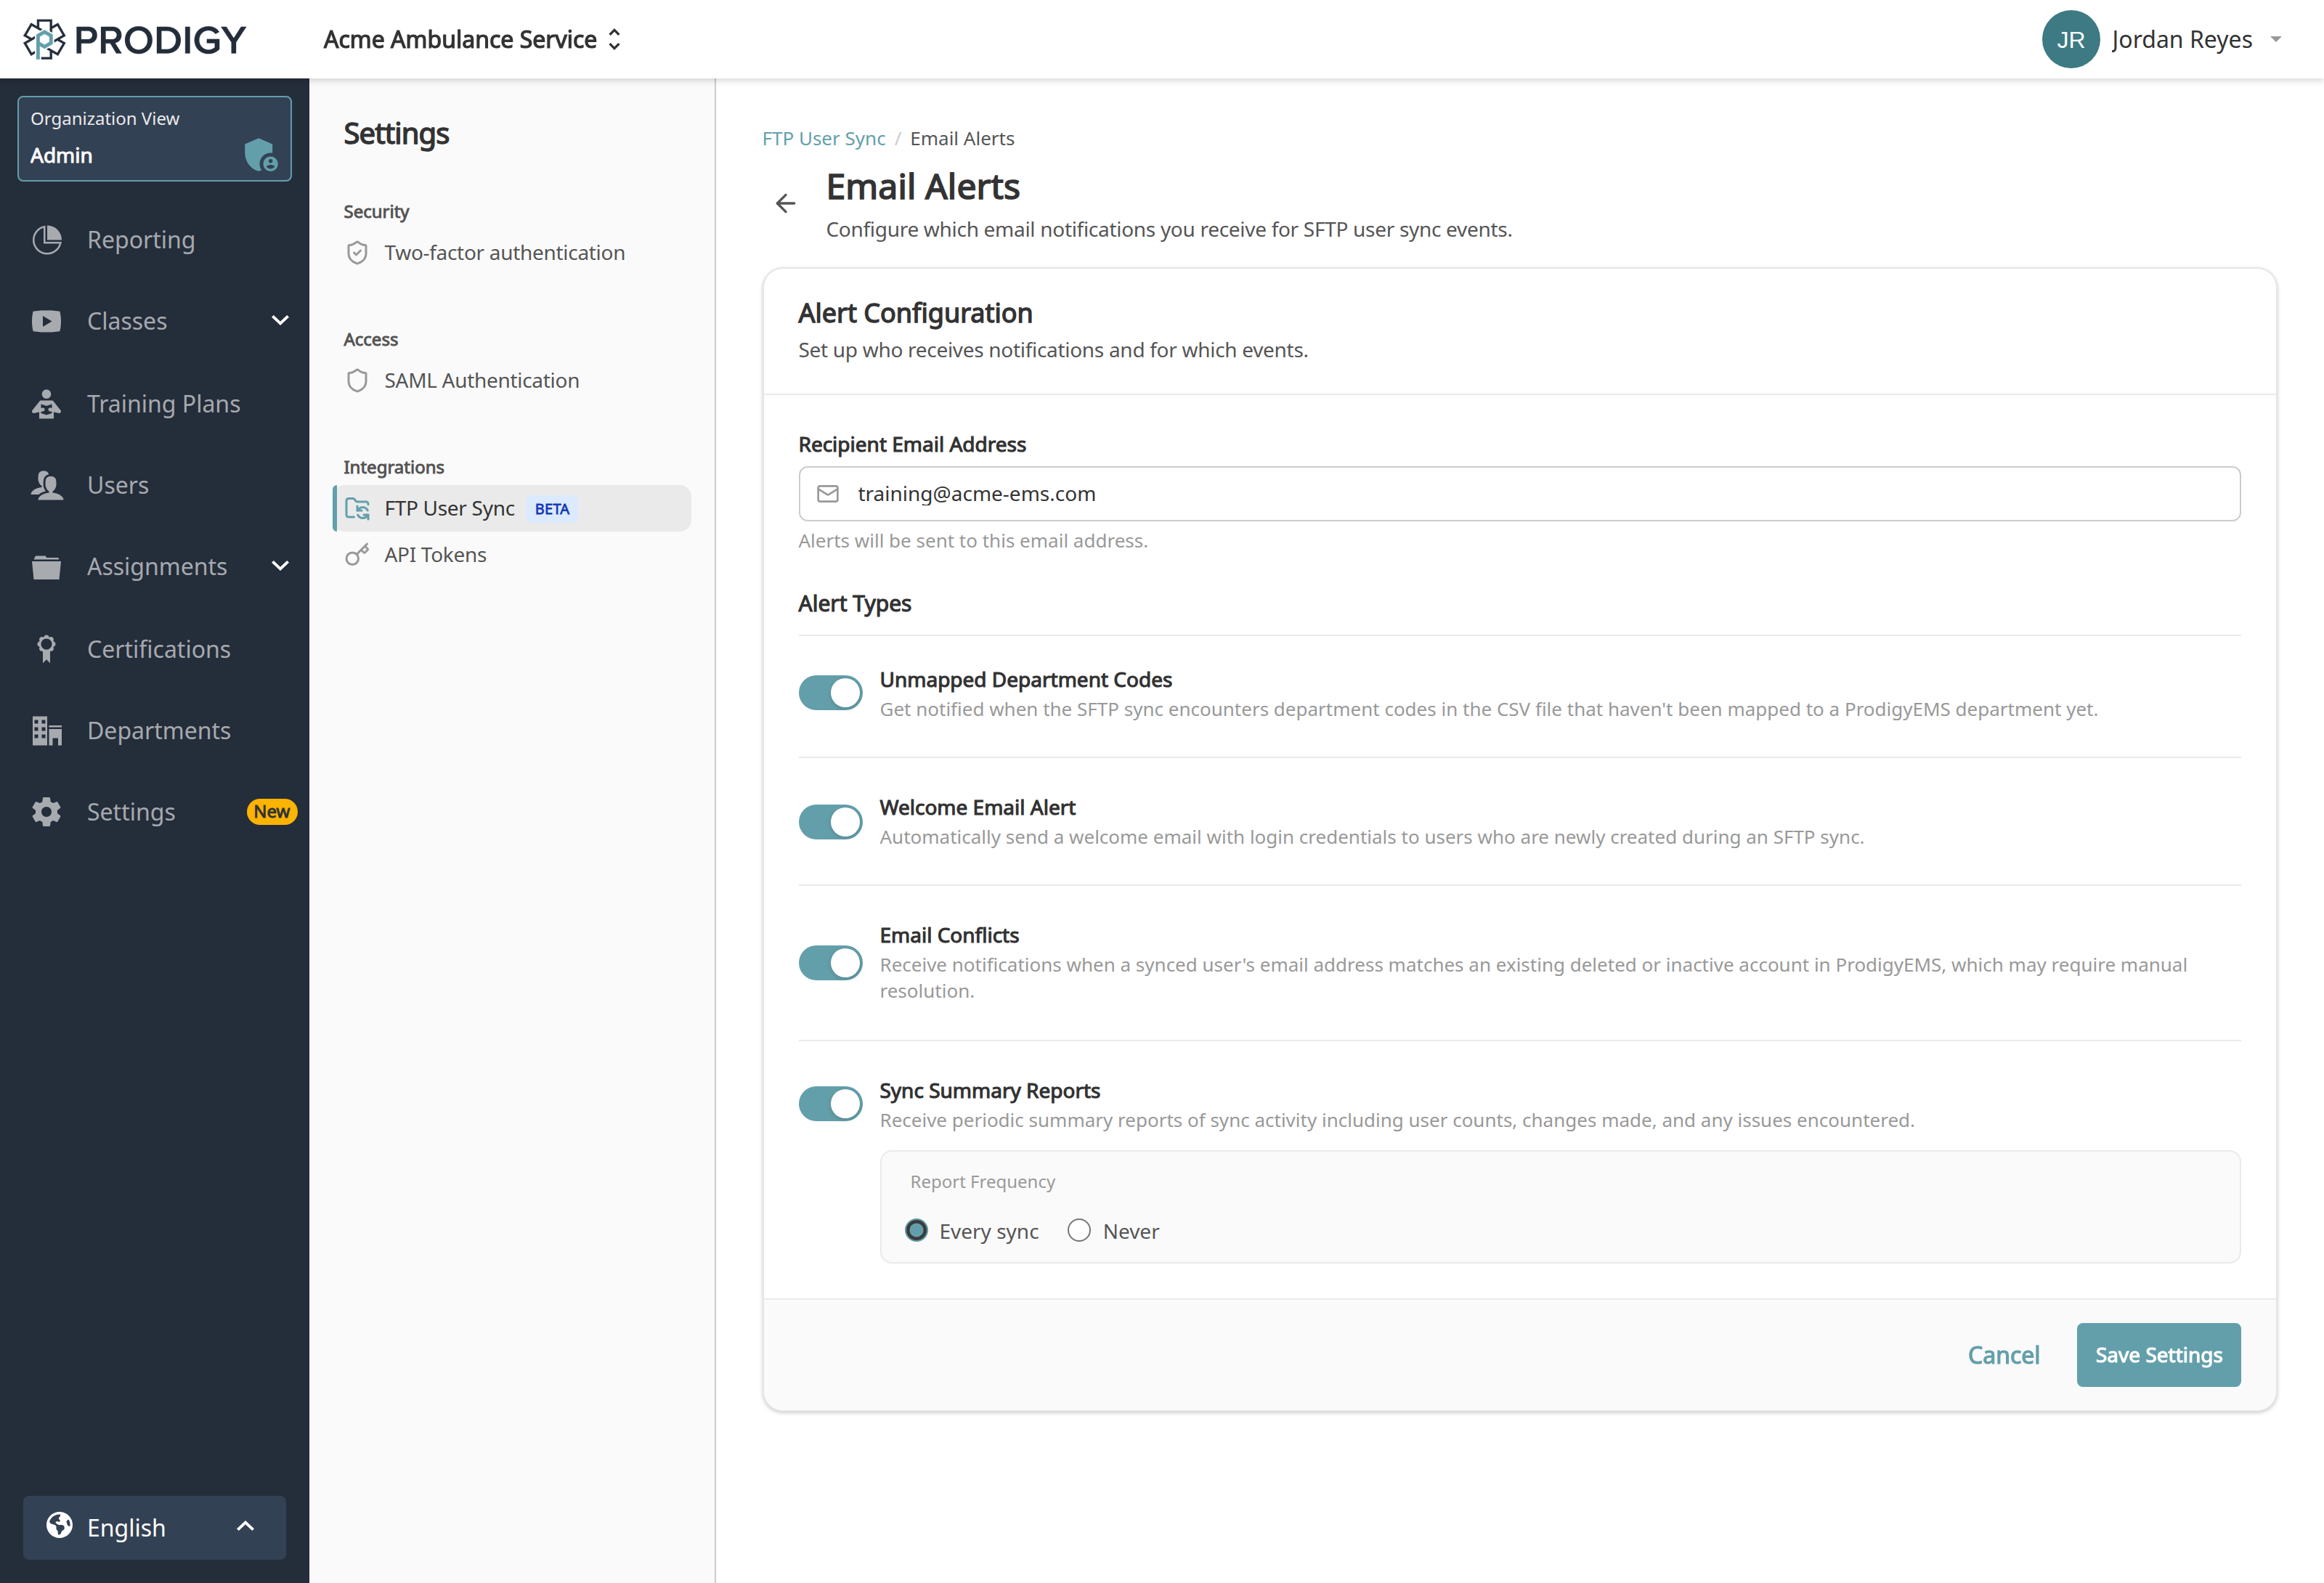
| Alert | What it covers |
|---|---|
| Sync failures | Connection issues, file format errors, and other technical problems. These are always sent, with no configuration needed. |
| Sync summary reports | A summary report after each processed file: user counts, changes made, and issues encountered. Set the frequency to every sync, or never to turn summaries off. |
| Unmapped department codes | A CSV contained department codes you haven't mapped yet. |
| Email conflicts | A synced user's email matches an existing Prodigy account that can't be linked automatically, which needs manual resolution. |
| Welcome email to new users | Automatically send new users created by the sync a welcome email with their login link. |
Step 4: Upload your first file
Configure your HR system to deliver files with these rules, all shown on your Configuration card:
- Upload directory: your
/inbox/folder (shown as/your-username/inbox/on the dashboard) - File name:
your-username_user_sync_YYYYMMDD_HHMMSS.csv, where the timestamp is the export time, for exampleacme-ems_user_sync_20260729_060000.csv. Files that don't match this naming convention are rejected. - Format: a UTF-8 CSV with a header row, up to 50 MB (roughly 100,000 rows). If your roster is larger than that, split it into multiple files.
Files are picked up automatically, with Prodigy checking for new uploads every 5 minutes. There's nothing to trigger manually. Once your first file processes, it appears under Recent Activity on the dashboard and in the sync history.
Full roster every time
Send your complete active roster in every file rather than only changes. The sync works out what's new, what changed, and what to deactivate. Full-roster files also let Prodigy's safety check catch truncated uploads (see Safety features).
The CSV file format
The SFTP sync reads the same columns as the manual Upload Users CSV importer, so one file format covers both. The sync is the stricter of the two: it always requires department, status, and employee_id, which a department-level manual upload doesn't need.
Required columns
| Column | Contents |
|---|---|
firstname | First name |
lastname | Last name |
email | A valid, unique email address |
employee_id | The unique identifier from your HR system. This is how the sync recognizes the same person across files, so it must be stable. |
status | active or terminated |
department | A department code that matches one of your configured department mappings |
Optional columns
| Column | Contents |
|---|---|
role | general user, training officer, or admin. When blank, the department mapping's Default Role applies. |
hire_date | Hire date in YYYY-MM-DD format, stored on the user's department record. A blank value never erases a date that's already set. |
termination_date | Termination date in YYYY-MM-DD format, stored the same way. |
ems_id | The user's 12-digit EMS ID (dashes are fine). Only filled in when the user doesn't already have one; an existing EMS ID is never overwritten. |
Values are case-insensitive and surrounding whitespace is ignored, so Active or Training Officer work fine. Files exported from Excel using CSV UTF-8 work as-is, and quoted fields (including commas or line breaks inside quotes) are handled correctly.
Certification columns
You can also include each provider's existing certifications, which is especially useful when onboarding a large roster, so everyone starts with the right training plan. Certifications are seeded onto brand-new accounts as they're created, and added for existing active members of your organization. Add up to five certification groups using numbered columns:
cert1_type, cert1_state, cert1_city, cert1_level, cert1_number, cert1_issued, cert1_expiration
cert2_type, cert2_state, cert2_city, ...
Fill in whichever fields apply to each certification (for example, a state EMS certification has a state and level, while a CPR card may only need issue and expiration dates) and leave the rest blank. Dates use YYYY-MM-DD.
certN_type must match a certification type name from the Certifications tab, and certN_level is limited to EMR, EMT, AEMT, or Paramedic — there is no Intermediate. NREMT and State EMS certifications need the full detail set, and other types need only a type. The certification columns reference covers the type and level values, the per-type required fields, and the NREMT number format in full.
A certification that fails validation is skipped on its own — the reason appears in the sync detail, and the rest of the row still syncs.
Example
firstname,lastname,email,employee_id,department,status,role,hire_date
Avery,Johnson,avery.johnson@exampleems.com,EMP-001,DEPT-001,active,general user,2024-01-15
Harper,Williams,harper.williams@exampleems.org,EMP-002,DEPT-002,active,training officer,2023-06-01
Ethan,Miller,ethan.miller@exampleems.org,EMP-005,DEPT-001,terminated,,2022-03-10
For a complete template including the certification columns, download the sample CSV. The same file is available from the Download Sample CSV action on the dashboard.
What happens to each row
For every row in a file, the sync finds the right user and applies the change:
- Returning employee ID: if the
employee_idhas synced before, the row updates that user, refreshing their department assignment, role, status, and hire/termination dates. - Existing Prodigy user in your organization: if the email matches an existing user in your organization, the row is linked to that account and the same updates apply. From then on they're tracked by employee ID.
- Existing Prodigy account outside your organization: the sync never silently absorbs an account your organization doesn't already manage. Instead, the person is sent an email invitation — they join your department (with any certification data from the row applied) when they accept. Rows Prodigy can't create an invitation for are flagged for manual review.
- New user: otherwise a new account is created in the mapped department. If the welcome email alert is enabled, they receive a login link automatically. A
terminatedrow for someone with no Prodigy account is skipped, since there's nothing to deactivate.
A terminated status deactivates the user's department membership, removing their access, the same as toggling a user to Inactive on the Managing Users page. If they're rehired later, a subsequent active row for the same employee ID reactivates them with their training records intact.
Prodigy stays the system of record for profiles
After a user's account exists, later sync files don't overwrite their name or email in Prodigy. Users manage their own profile details, and the sync focuses on what HR actually owns: who's employed, in which department, and in what role.
Roles are capped
The role a sync can assign is capped by a per-organization limit, and the cap defaults to General User. Rows requesting a higher role are clamped down to the cap, so a mistake in an HR export can never silently mint admin accounts. If you want the sync to manage training officer or admin roles, ask your Prodigy representative to raise the cap for your organization.
Safety features
A few guardrails protect your roster from bad uploads:
- Row-count drop protection: if a file contains dramatically fewer rows than your previous completed sync (below roughly 80%), the sync aborts and sends a failure alert instead of processing it. This catches truncated exports, a network failure mid-export could otherwise look like a mass termination and deactivate large parts of your roster. Growing is always fine, so starting with a small pilot file and scaling up to the full roster won't trigger it, but going back down to a small test file after a full-roster sync will. If you have a legitimately large reduction coming (for example a divested division), contact support and we can adjust this behavior for your organization.
- File name validation: files that don't match the
username_user_sync_YYYYMMDD_HHMMSS.csvconvention are rejected before any processing. - The Sync Active toggle: the dashboard has a Sync Active switch you can turn off any time, during an HR system migration, for example. While disabled, new files are not processed. Re-upload any files that arrived while sync was off after you re-enable it.
- Email conflict review: if a row's email matches an account the sync can't safely link on its own — a deleted or inactive account, or one belonging to someone outside your organization — that row is held for manual review rather than silently reactivating, duplicating, or absorbing the account. It's flagged in the sync detail (plus the email alert, if enabled).
Monitoring your syncs
The dashboard
The FTP User Sync dashboard shows sync health at a glance: an overall status (Healthy, Paused, Completed with Errors, or Error), totals for users synced, a sync activity chart, and the latest processed files under Recent Activity. The Configuration card below repeats your full connection details whenever you need them. Files are checked for automatically, so the dashboard is informational; there's nothing to run by hand.
Sync history
View Sync History opens the complete log of every processed file. You can filter by result (Success, With Errors, Failed), and search by file name or date.
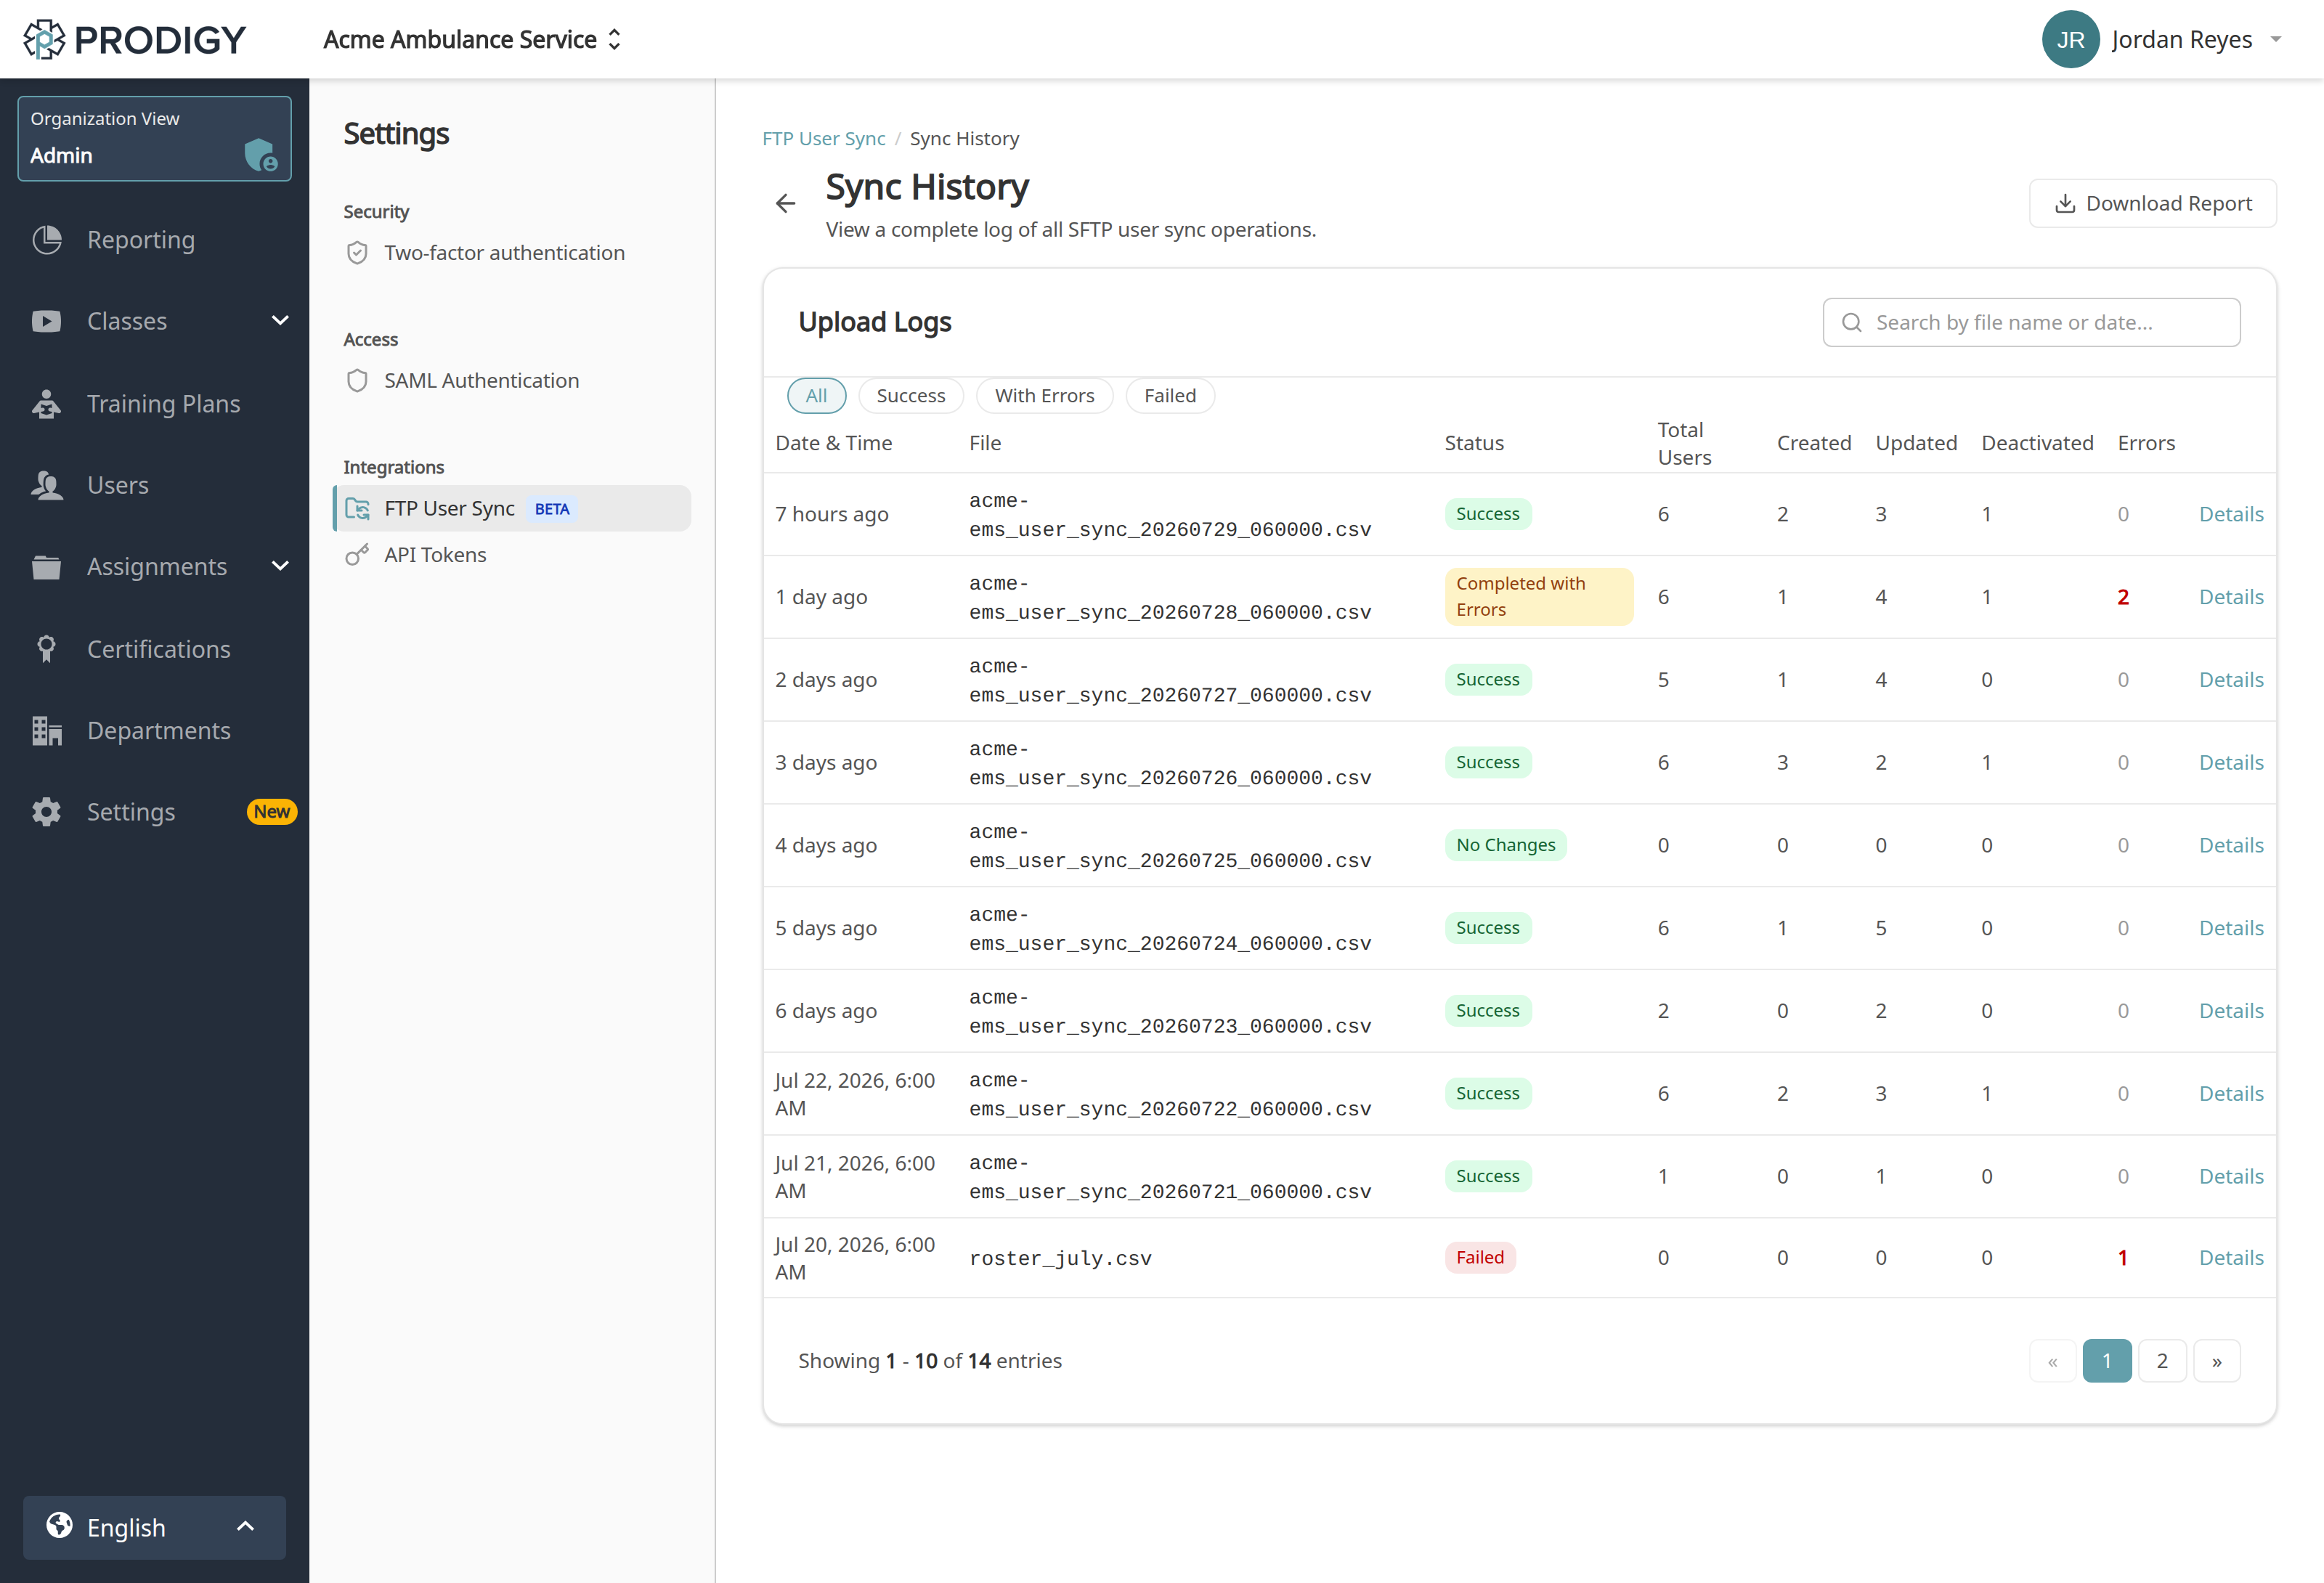
Each sync shows one of these statuses:
| Status | Meaning |
|---|---|
| Success | Every row processed cleanly |
| No Changes | The file processed but nothing needed updating |
| Completed with Errors | The sync finished, but some rows were rejected. Check the detail view. |
| Failed | The file could not be processed at all |
| Running / Pending | The file is currently processing or queued |
| Interrupted | Processing was cut short; the file is automatically retried |
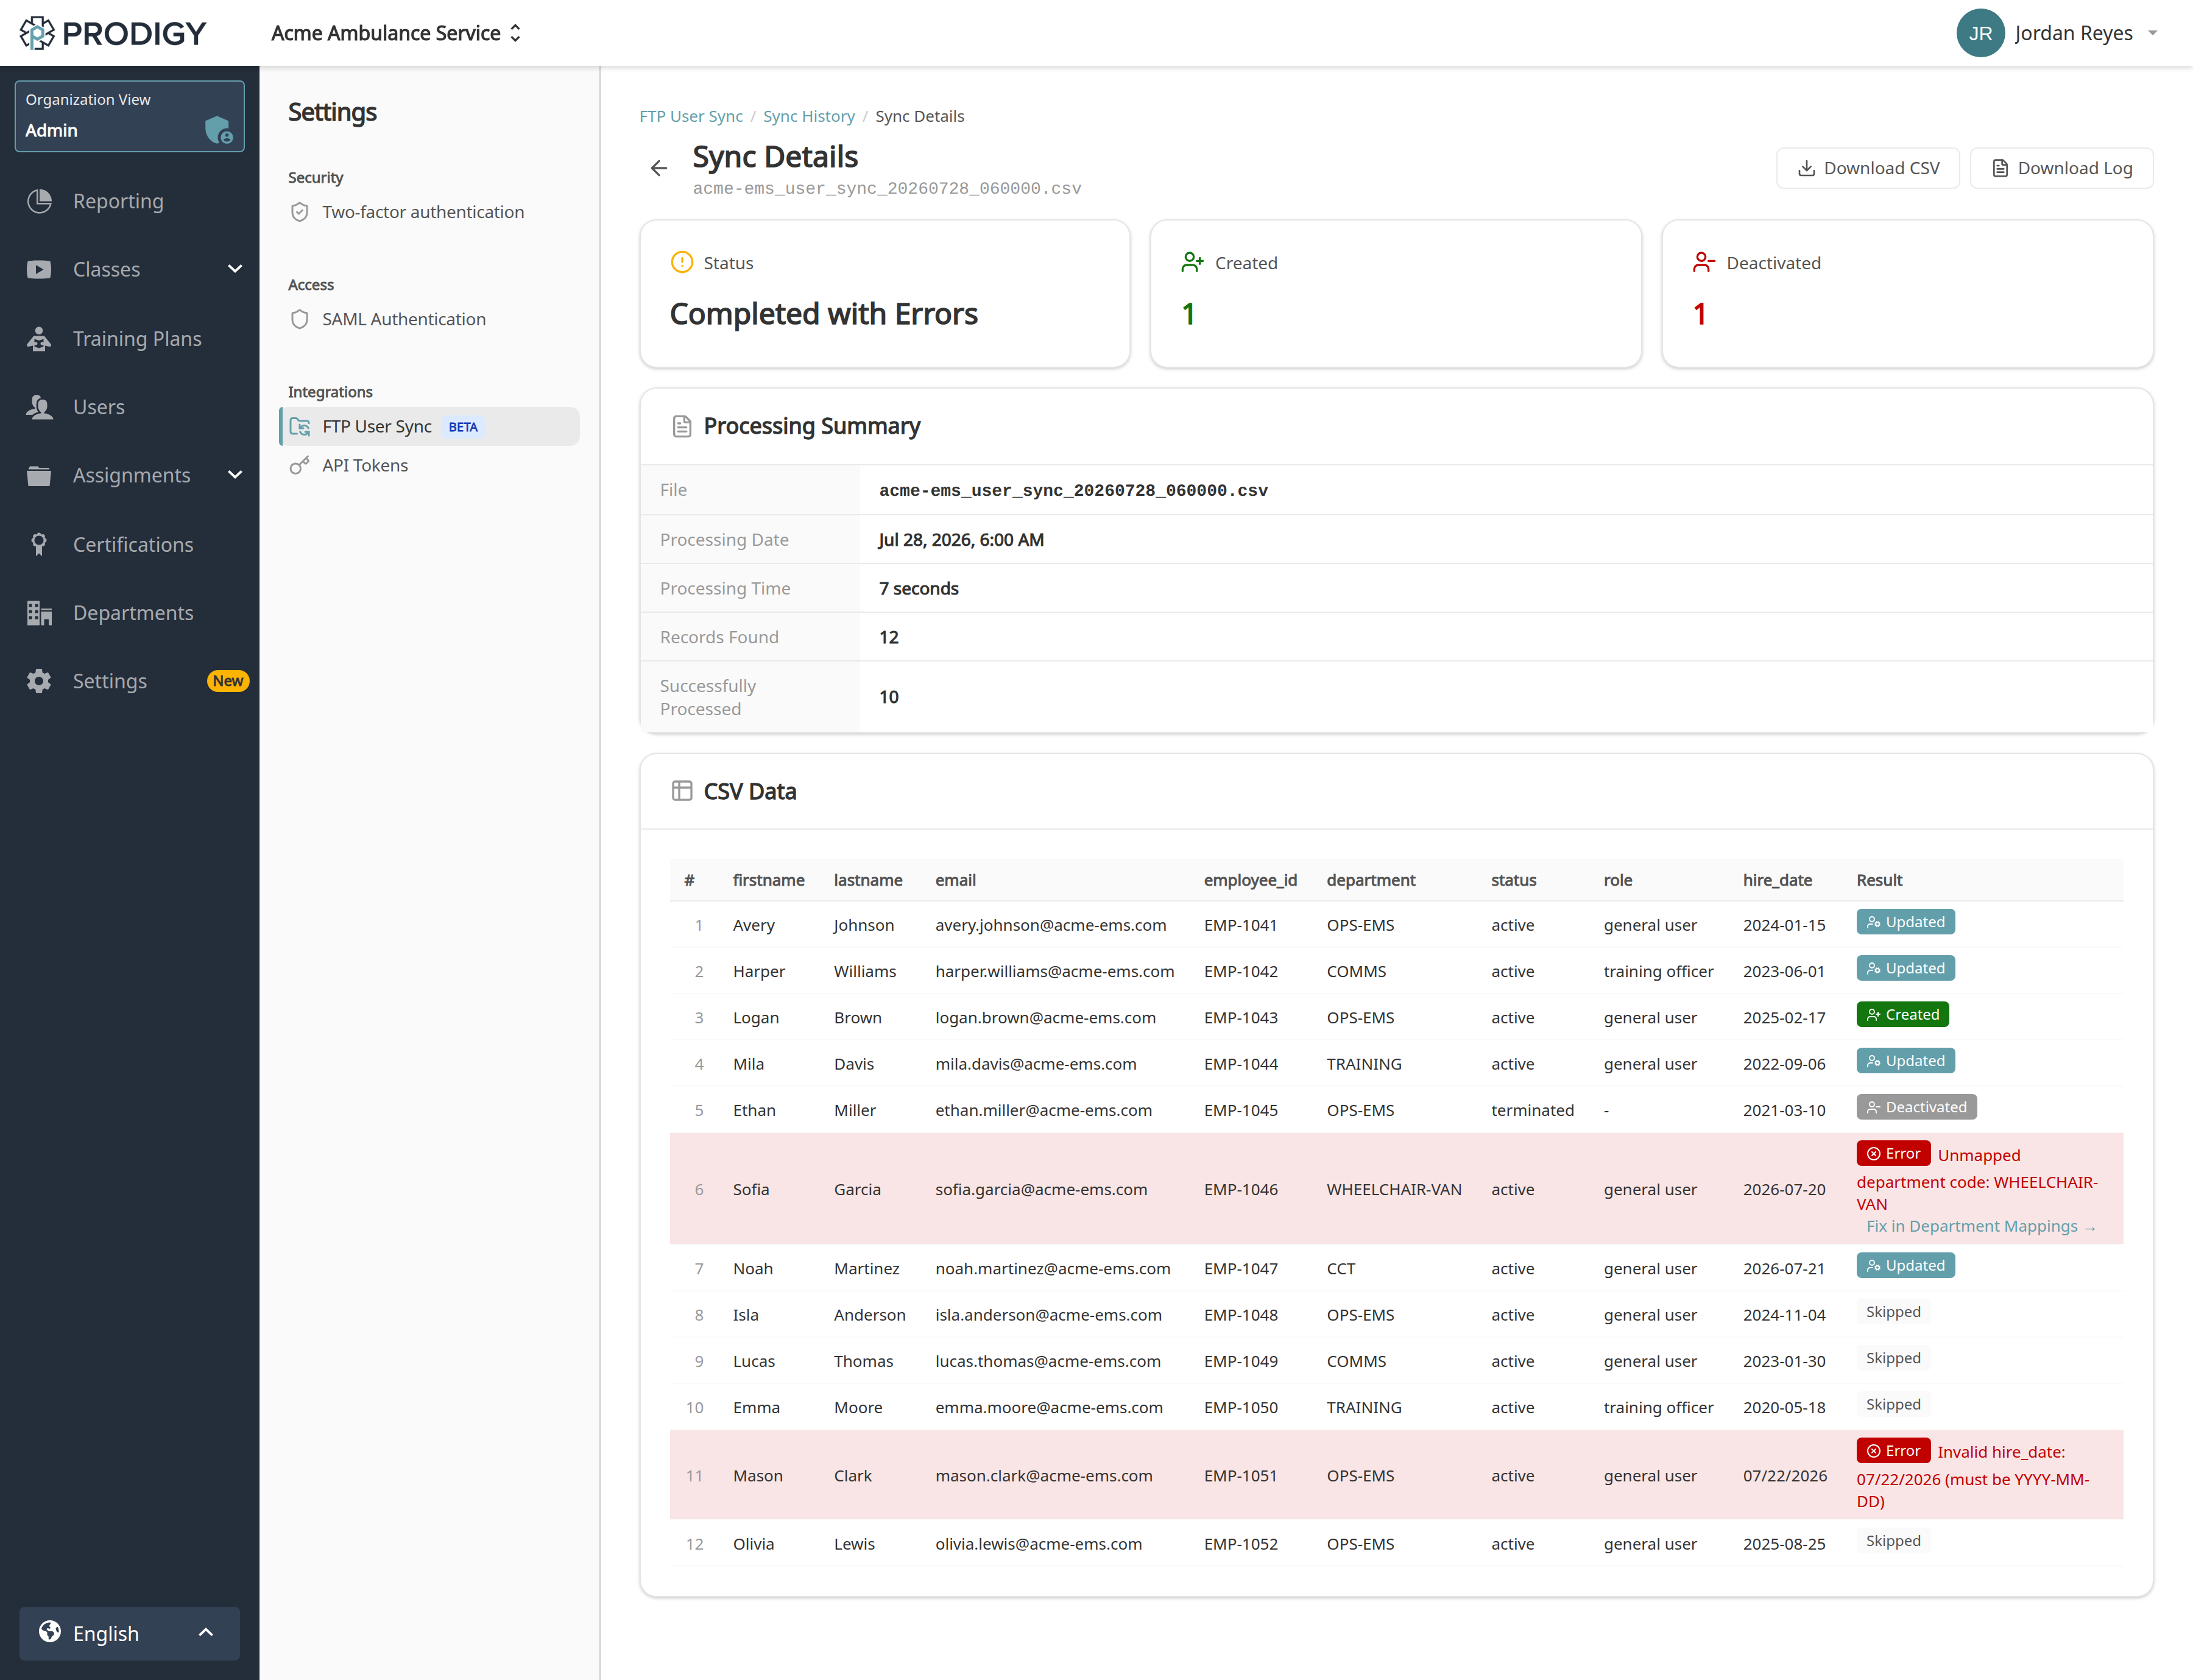
Click Details on any sync to see the full picture: a processing summary (records found, successfully processed, created, updated, deactivated), the outcome of every row, and each error with its row number and reason. Rows rejected for an unmapped department code even link straight to the Department Mappings page so you can fix the mapping on the spot. You can download the original CSV or the annotated log from here for your records.
Troubleshooting
| Error | What it means and what to do |
|---|---|
File name does not match required convention | The upload's file name is wrong. Rename to your-username_user_sync_YYYYMMDD_HHMMSS.csv and upload again. |
Missing required field: ... | A row has a blank required column. Fix the export and resend the file. |
Unmapped department code: ... | The row's department code has no mapping. Add it under Department Mappings, then resend the file (or wait for the next scheduled one). |
Invalid status: ... | The status column must be active or terminated. |
Invalid role: ... | The role column must be general user, training officer, or admin, or left blank. |
Invalid hire_date / termination_date | Dates must be in YYYY-MM-DD format. |
Invalid email format: ... | The email address isn't valid. |
Missing certification type / Unrecognized certification type '...' | The certN_type value is blank or isn't a certification type Prodigy knows. Match the name shown in the Certifications tab. |
Missing certification level / Unrecognized certification level '...' | NREMT, State EMS, and CCEMT-P rows need a level, and it must be EMR, EMT, AEMT, or Paramedic. |
Missing required field '...' for this certification | NREMT and State EMS certifications need state, city, number, issued, and expiration. |
Invalid NREMT certification number format | An NREMT number is letters followed by seven digits, for example M1234567. |
| An email conflict "requires manual review" | The row's email matches a deleted or inactive Prodigy account, or one outside your organization, and can't be linked automatically. Contact support@prodigyems.com and we'll help resolve it. |
Aborted: ... (row count drop) | The file was much smaller than your last sync, so it was rejected as a possible truncated export. Verify the export completed fully and resend; if the smaller file is intentional, contact support. |
| Provisioning shows Failed | Click Retry Provisioning on the dashboard. If it keeps failing, contact support. |
If a whole file fails rather than individual rows, the sync failure alert email and the sync detail page will both include the reason.
Need help?
If you're setting up an HR integration and want a hand, or something in a sync doesn't look right, reach out to support@prodigyems.com. We've helped connect a range of HR platforms and are happy to work with your HR vendor directly.